How to create a Website in 10 minutes step-by-step
Are you interested about creating your own online presence to manage your small business or to develop a responsive massive site whether for the motive of earning profit, storing your pivotal contents or just a royalty free site. Fortunately, those of you that are serious will successfully succeed in creating your own site after reading this in-depth step-by-step tutorial – How to create a website in 10 minutes.
First of all, how do you define a website?
Disclosure: Some links in this post are affiliate-supported. And we do earn some commission at no cost to you when you sign up with those links. This helps us to maintain a Nascent community – please do contribute by signing up via our links. Your support is highly appreciated and the Lord will reward you abundantly!
Definition of website
A website may be simply defined as the total collection of webpages and other related contents that is identified by a unique domain name and published on at least one web server.
More than 90% of people think that setting up a website is way too difficult as usual. But here's a reminder that it is no longer tricky as you think.
Back in the 2000s, website are created by tweaking HTML codes, CSS and PHP which requires a high level of training and dexterity to achieve. As a result of this, most people still think that creating a website is a strenuous duty but it's no longer tricky that way due to the invention of CMS (content management system) like WordPress.
Nevertheless, let's take a deep dive on this post intents. This article is categorized into 3 broad captions or steps as follows
- Website building platform
- Web hosting and Domain Name
- Site setup and Design
Now before creating a website you've to use a web design software or a website building platform. This will lead you to step 1.
Step 1. Website building platform
A website building platform as it name implies is a system that is used to create and design a website. As aformentioned above – setting up a website back in the 2000s can be time-consuming and requires a high level of training. Nowadays, it's no longer the way it was because of the invention of Content Management system (CMS) or specifically the WordPress site.
As you can see in the diagram – nearly half of all websites in the world are built with WordPress – making it the most popular website building platform.
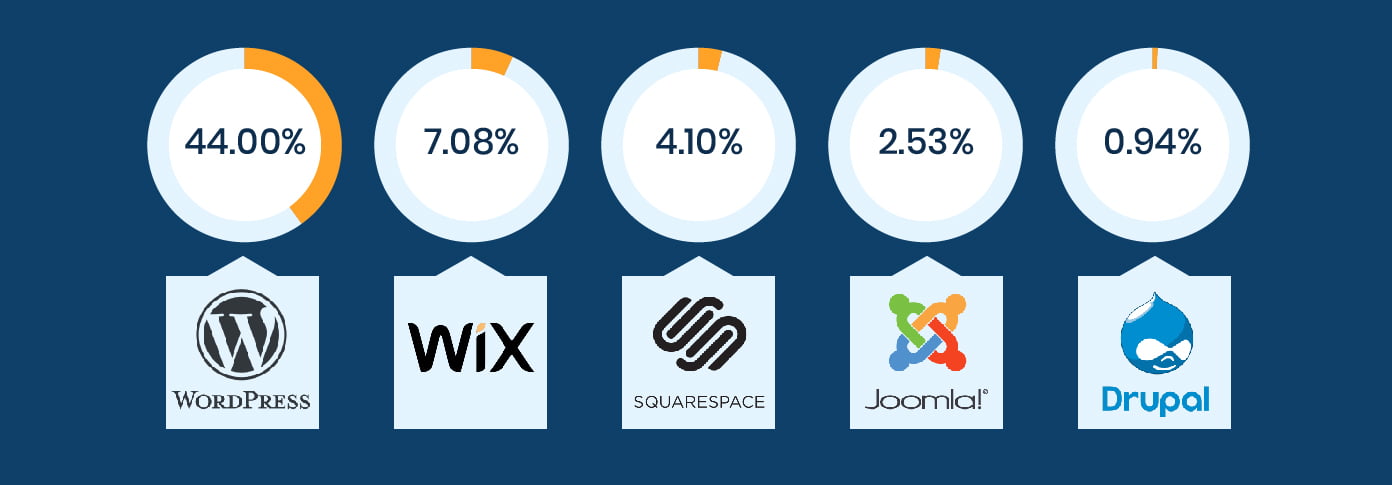
Why should i use WordPress for my website other than website builders
- 1. It's free and popular
Excepting that nearly half of all website in the world are built by WordPress – It doesn't even cost a dime to install, download or use. It's an open source software made by web developers to facilitate site set up and design. Additionally other website building platform cost alot unlike the WordPress platform.
- 2. It's user friendly
The fact is that if you're familiar with Google docs – you can create and design the kind of look you prefer. It's very easy to use unlike it's counterparts, making it worth going after.
- 3. Your site will be responsive
Your site will be pretty responsive meaning that it'll work perfectly on both smartphones and tablets too
- 4. Their 24/7 help community
The amazing WordPress help community has made It quite easier to ask and get your answers asap if you get stumped somewhere. You can get help from here for free or you can hire thousands of WordPress developers here.
Are there any good aternatives to WordPress?
Yes, there are some. But I will still use WordPress. Here are some good aternatives to WordPress
- Wix is an easy-to-use website interface with a drag and drop feature but it's costly and aren't good for larger sites. The worst imperfection is that you can't migrate your website to another building platform if the need arise.
- Squarespace is a web design software that makes creating beautiful websites easier, but it comes at a high monthly cost and it can't migrate your website out if the need arise.
- Joomla is almost like WordPress but it do require the test of time to master. This is a nice web design tool that requires the basic wit of writing code in getting started.
- Drupal is another popular web design platform with lots of high experienced coders and web designers, but it comes with a high learning curve and it's not the best option for dummies.
After all, we advocates using WordPress to get everything a perfect site needs and it's the platform we'll be focusing on through all this tutorial.
Now, don't just go and look for WordPress for this is not the right time to prevent missing some useful facts. Sure to stick around as we work you through the process of choosing a domain name and hosting.
How to create a website in 10 minutes, step 2…
Step 2. Web hosting and Domain name

After opting for a website building platform (WordPress), the next thing that follows is domain name registration and web hosting.
A Domain name is the simplified version of an IP address that makes web address catchy. Domain name are represented by letters like yourwebsite.com instead of using huge IP address like 196.786.
It works this way – When a user types in a life domain name, a DNS server will convert this address back to an IP address thereby indicating the site. Just look at the diagram

Simply, it's the address to which a visitor will have to type inorder to visit your site.
In the same context, web hosting is like storing all your web content in one place so that visitors can be able to see it when they visit your site. Without it, your site will be horrendously blank.
To get a domain name and web hosting, a domain and web hosting registration platform is required. And While there are so many platforms that offers this, Bluehost.com turns out to be the number 1 recommended hosting platform by WordPress which we'll be using.
Why should you choose Bluehost?
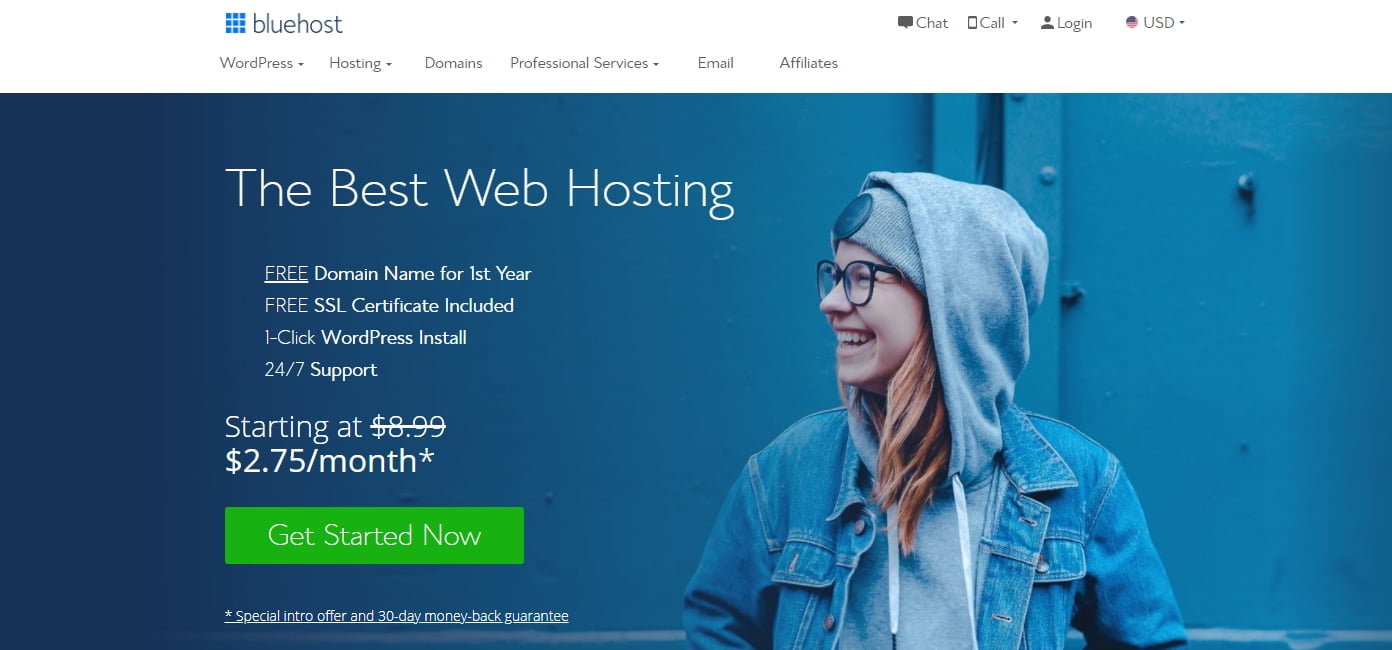
- For A Better sites speed and performance
With Bluehost, your site speed and performance are accelerated to reach 100% and remember that site speed is a ranking factor utilized by Google these days. As far as bluehost is concerned you can get your content at #1 search engine result page.
- Free domain name for 1 year
It offers a free domain name for one year when you sign up for web hosting today. What a nice perk to start with!
- It's popular and recommended by WordPress
The site is very popular than it counterparts due to their unique services like their one-click WordPress installation and much more. It's also a recommendeded hosting provider by WordPress.
How to pick a perfect domain name – things to consider
Before you head over to Bluehost.com. You ought to be able to have a pick of a domain name that best represents your site or business. Here are things you should put in consideration before grabbing a domain name.
It must be representative
A domain name should be dependent on the niche of a site. That means, your domain name should represent your website niche. For example, if you are a chef trying to showcase your talent to the world, then your domain name should depict your site intent like foodrecipes.com, e.t.c. Additionally, if you are creating a personal site for the storage of important files, then yourname.com can be really effective.
On the other hand, a domain name should be equally dependent on the location of the site as well as their primary motive such as whether their mission is to make profit or it's totally a free site.
Examples;
- If your site is based in a given locality or country, then the appropriate domain extension (the last part of a domain begining with dot •) that is worth going after will be the site's internet country code like .co for Colombians, .uk for the United kingdom, e.t.c. You can search the internet country code of your country on Google inorder to select the right domain extension.
- If you are making a nonprofit or charitable organization then go with the .org extension.
- The .com is used for website that are accessible allover the world. It has no restriction. This extension portrays that a site is global and not confined to a limited zone. It's the most used domain extension throughout the globe.
- There are other domain extensions like .me, .online, .blog, .biz, e.t.c You can only opt for them if they represent your niche, for example the .blog is commonly used by bloggers, the .biz indicates a business site while the .me represents a personal site.
My best advice is to ditch all the other extensions and go with the .com since it is popular without restriction. You are also free to go with the other extensions if they are representative to your site.
- It must be catchy
A domain name should be pronounceable, crammable and memorable. If a domain name is incomprehensible, then chances are – your website visitors may find it difficult to visit your site, and you know what this could lead to… You can lost potential viewers because of this. So use it wisely – Brainstorm for a memorable site address before grabbing one.
To complete Step #2, Go to Bluehost.com through my link for a discount. Then this will lead you to Step #3…
How to create a website in 10 minutes, step 3…
Site set-up and Design

In this last step, we'll be completing the process of site setup and design. To ensure ease of set-up – Copy my bluehost referral link and open a new tab with it. Note: that this comes with a discount at no cost to you.
Warning – Don't just go and look for bluehost.com because you won't get any discount.
To get a discount open a new tab with my unique link to ensure ease of setup
Then, follow this process or watch the video below to install WordPress
1. WordPress installation
Once you are on Bluehost.com. Follow this process to complete signup and WordPress installation.
- At the desktop page – you can find the big “get start button“. Click it to get going
- Then, you'll be prompted to select your preferred hosting plan ranging from the basic plan to the pro plan. We recommend going with the basic plan for now – you can upgrade later if you wish.
- Then you'll be redirected to a screen where you can sign up for a new domain name. You can use the other box if you already own a domain.
- Fill in all the required information and proceed to payment (you can also remove the extras to decrease the cost further)
- Login into your recently created bluehost account, “use one click WordPress install” to install WordPress.
2. Add exquisite functions
We advocates watching that exclusive video below to complete setting up, designing, and launching your site to life. Remember, a video is much more educative than a post!
Just skip the remaining contents by just watching the video below
Warning – The video was sponsored by hostgator.com (another web hosting platform). We hold our audience in high esteem and we want them to get the best experience – so don't be obsessed by the vid. Rather use Bluehost.com – the #1 recommended hosting server by WordPress, i.e bluehost.com.
Got it?
- a. Add a theme
Once you've done installing WordPress. The next thing that should come up in your mind is adding a new theme or template.
A theme is an already designed look of a site that makes site editing easier for beginners like you. Instead of starting a new site-look that requires a bunch of time and experience, you can just tweak the look and characters of the theme in a personalized form.
You shouldn't bother because WordPress has deluge of users making themes and other items for them. You can opt for the free themes or you can also go with the premium one if you wish. You can also buy a theme from other external website such as
But we don't recommend this because there are thousands of themes available for free on WordPress. You can only go ahead with those external theme market if none of the official theme suit your needs.
To install a theme in WordPress – head over to the Dashboard » Appearance » themes … and click > Add new
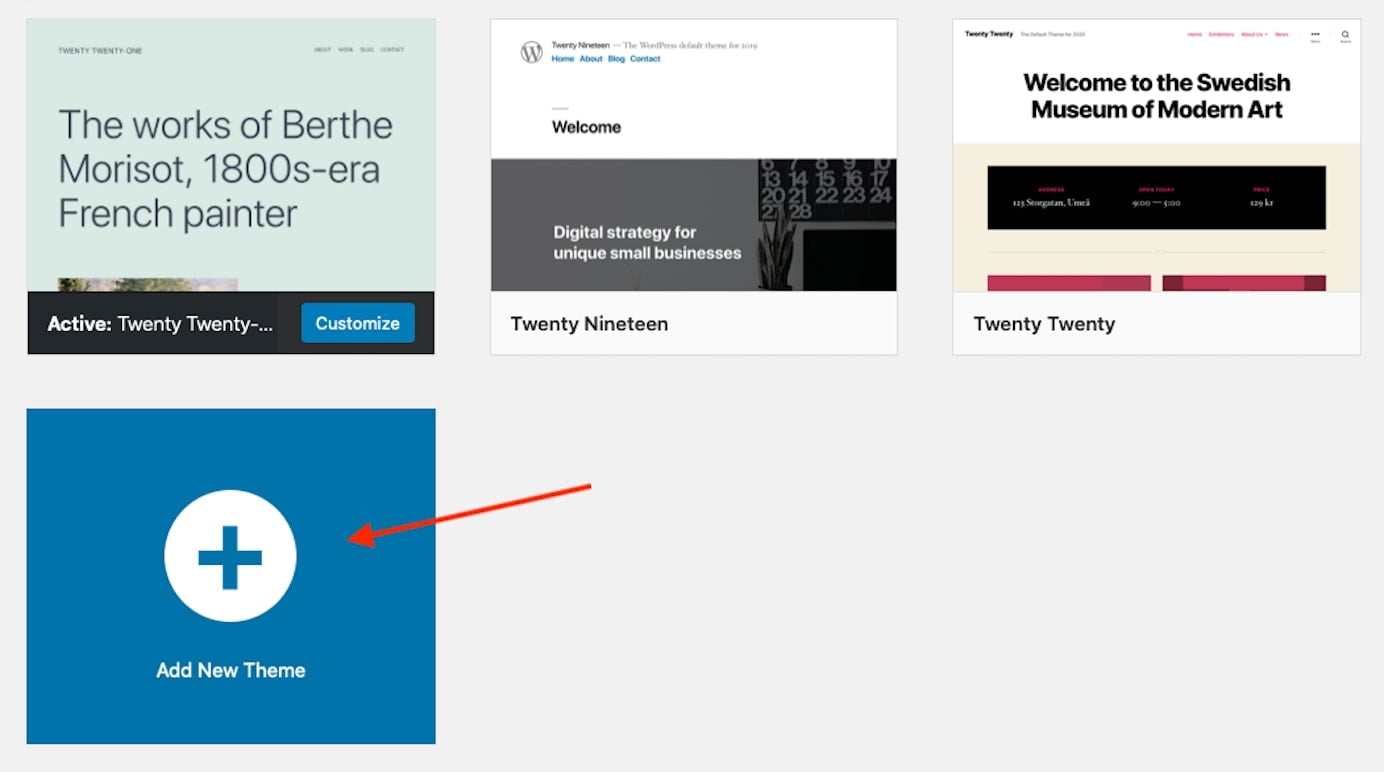
You can use the search box above to search for any theme. We recommend going with the “Astra theme” because it contains miscellaneous styles that can fit almost any site.
Before installing a theme – it's advisable to click the more button to familiarize its features. You can check out how relevant it's at this place too.
After reading more about the theme – click the install button if you like it » then activate the theme to get going.
- b. Install requisite plugins
Plugins are tools that helps extend the functionality of a site. It provides something that your site lacks, like if you don't have a contact form in your site – you can install a contact form plugin to add it.
While there are tons of plugins officially in wp (WordPress), there are ones you need to install to be able to design your site according to your own look. Ironically, one can't do everything with the official WordPress editor like adding an icon, e.t.c. This is the reason why the Starter-templates plugin comes to play.
i. Starter templates
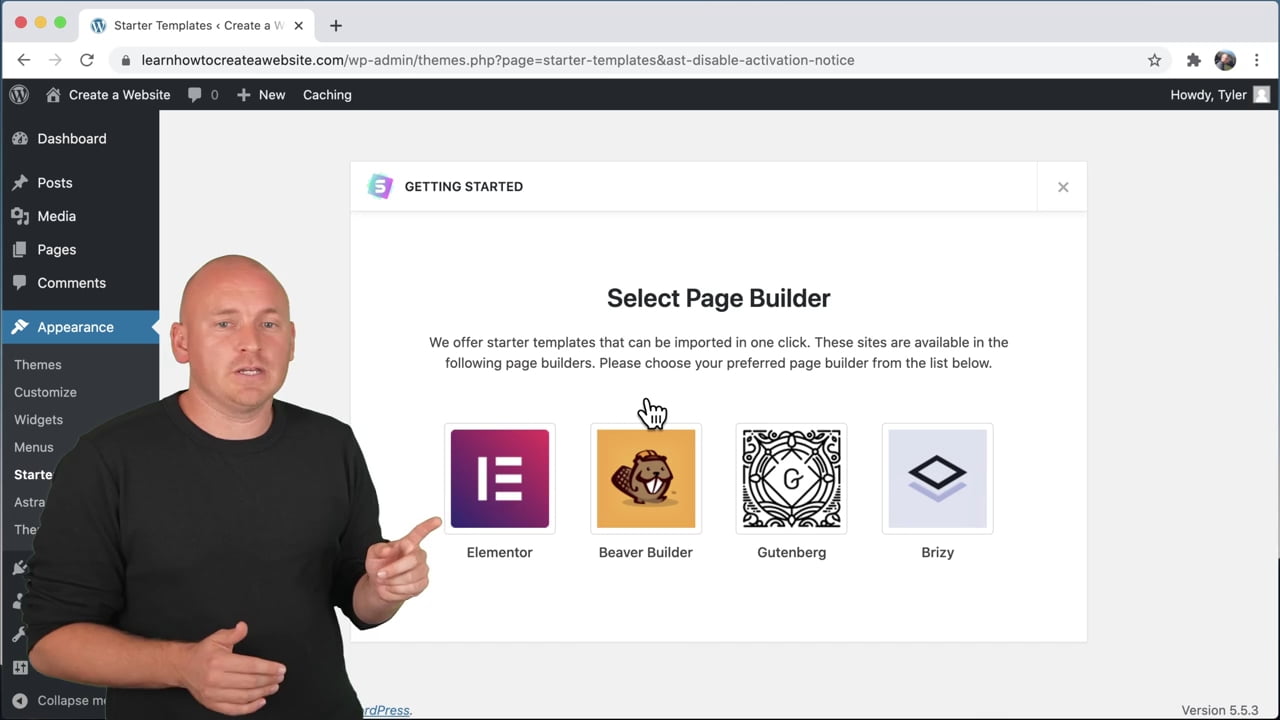
The “Starter-templates plugins” as it name implies creates an easy avenue to lessen the amount of time spent during site creation and design. It consist of four editors but we will be using only one of them – the Elementor. The Elementor is super much more better than all the rest options. Starter-templates consist of the…
- Elementor
- Beaver builder
- Gutenberg and the
- Brizy template
To install the Starter-templates plugin – navigate to plugins › Add new
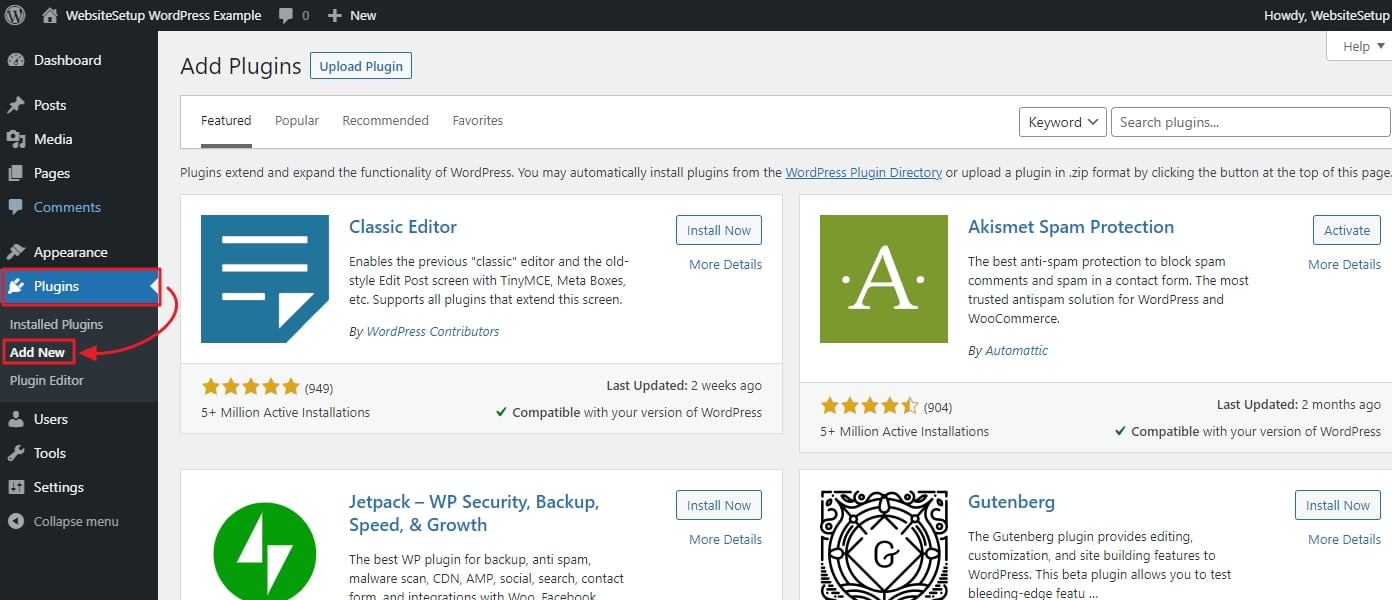
Enter “Starter-templates” in the search box and click search.
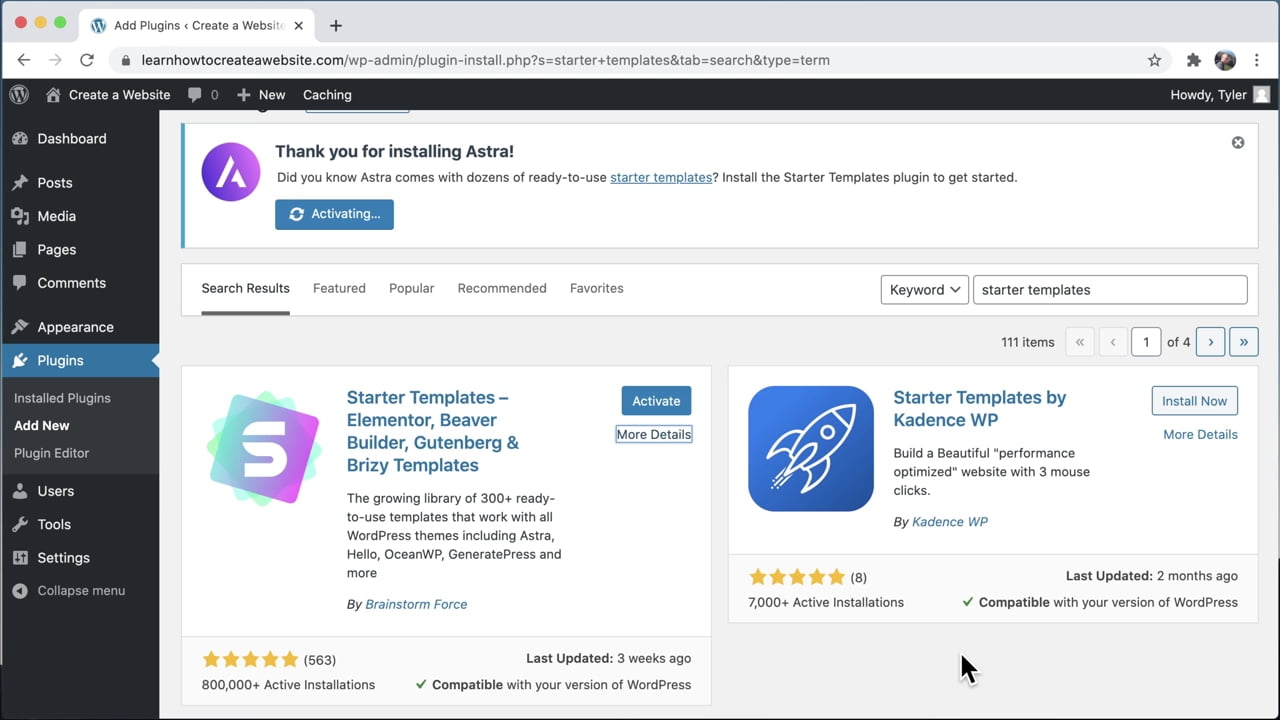
After that, hit the «install button» and wait for it to download. Then, smash the «activate button» to activate the plugin.
Once it's activated – it'll visible at the WordPress main menu. Click on it › ditch all the other editors and head over to the Elementor which we will be using…
Then, you'll be leaded to a screen containing thousands of templates to start with. You can use the search filter at the upper part of the page to ensure ease of selection. We recommend using the free search filter to highlight the free templates to start with as a newbie.
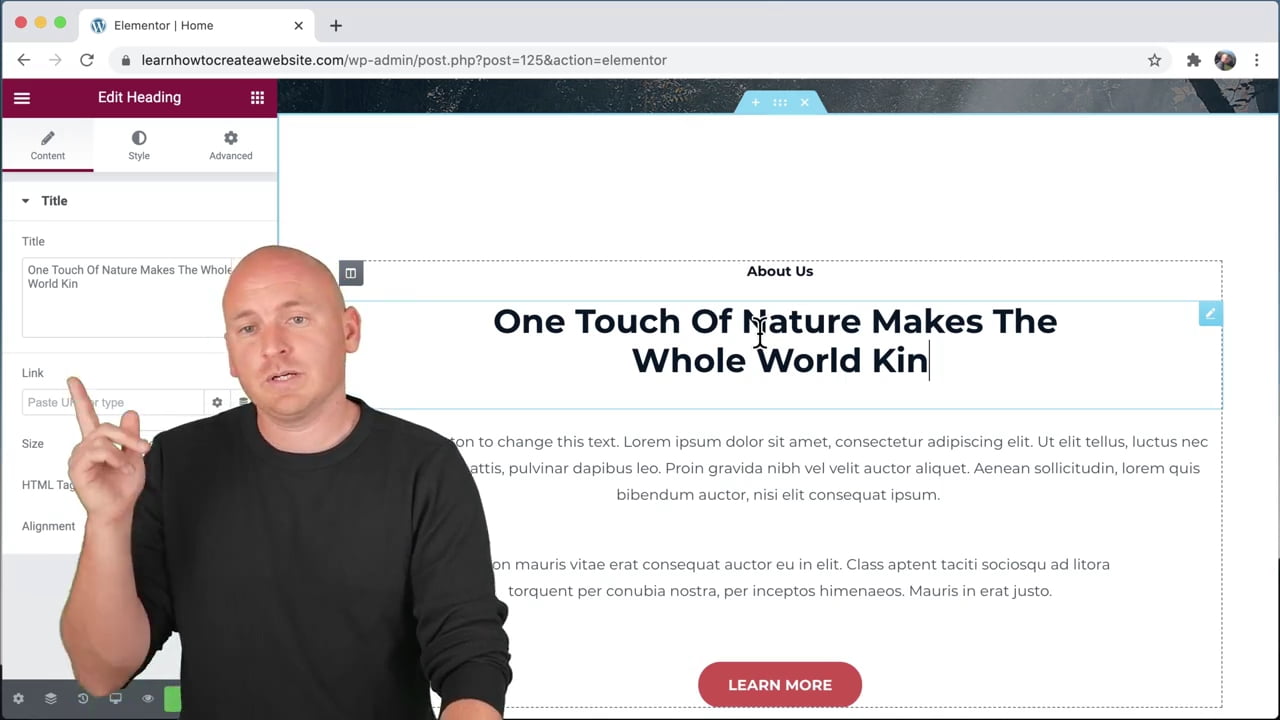
If you've indicated a template you like – click on it » then, click on the import complete site button »then, click on import once again to install it. Then, wait until it finish importing. You can also view the site's new look by clicking on view site.
Now, this can save the 10hrs of site's creation and design. Think of it – providing a template to start with rather than starting with a blank page. This can also help the dummies who are less experienced in site design.
You can use the Elementor page editor and the official WP editor to edit the template to a desired look. The philosophy of edition in WordPress is that anything you click on the left column will be editable at the right column in your PC. View the image ↓
Another requisite plugin to consider installing is one that can provide a backup of your site in case you messed things up. The plugin is called All-in-one-WP-migration.
ii. All-in-one-WP-migration
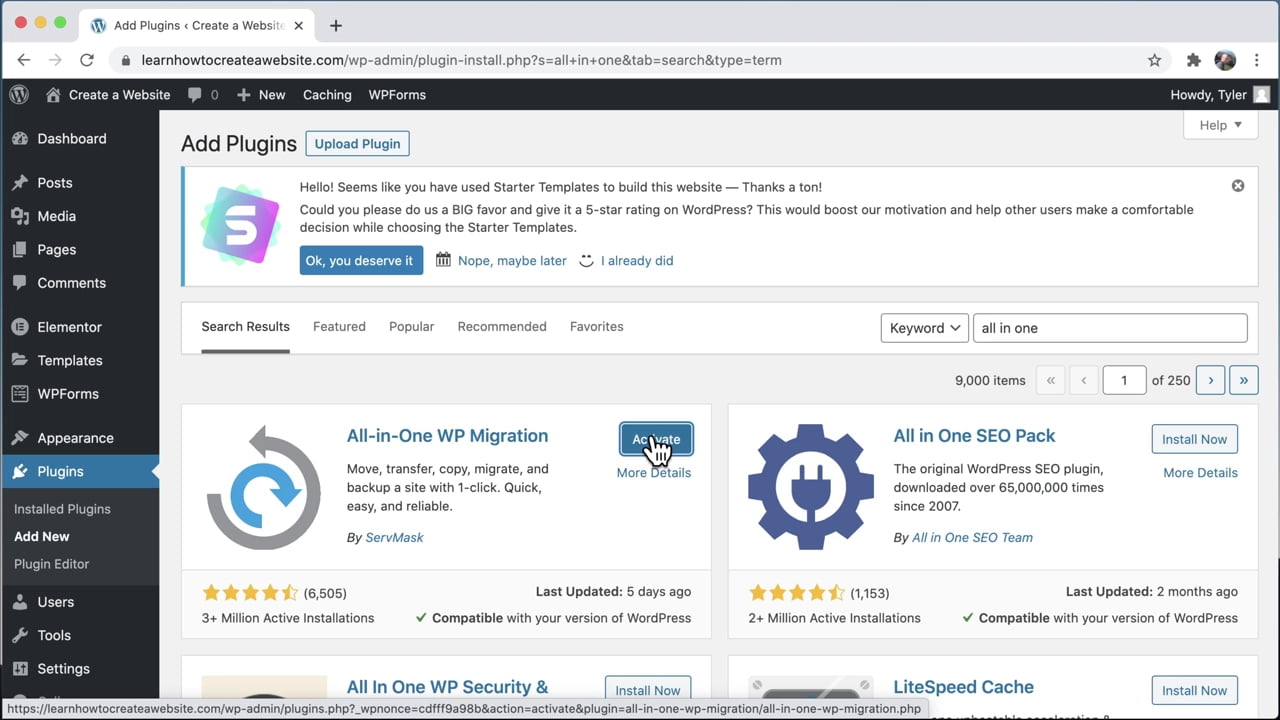
All-in-one WP migration is a WP plugin that provides dozens of your site backup for future reference. This can be crucial when you accidentally make a mistake in your site.
To install this plugin » follow the same guideline that we used to install the Starter-templates plugin to proceed.
To save a backup of your site – click the plugin at the lower part of the WP menu. Then click the Export button » file > Download. To see or restore the backup of your site – click the button that says backups at the drop-down menu. Next, you'll find an option to delete or to restore the backup right away.
Then the next feature that a New site should have is ease of communication…
iii. Smartsupp live chat
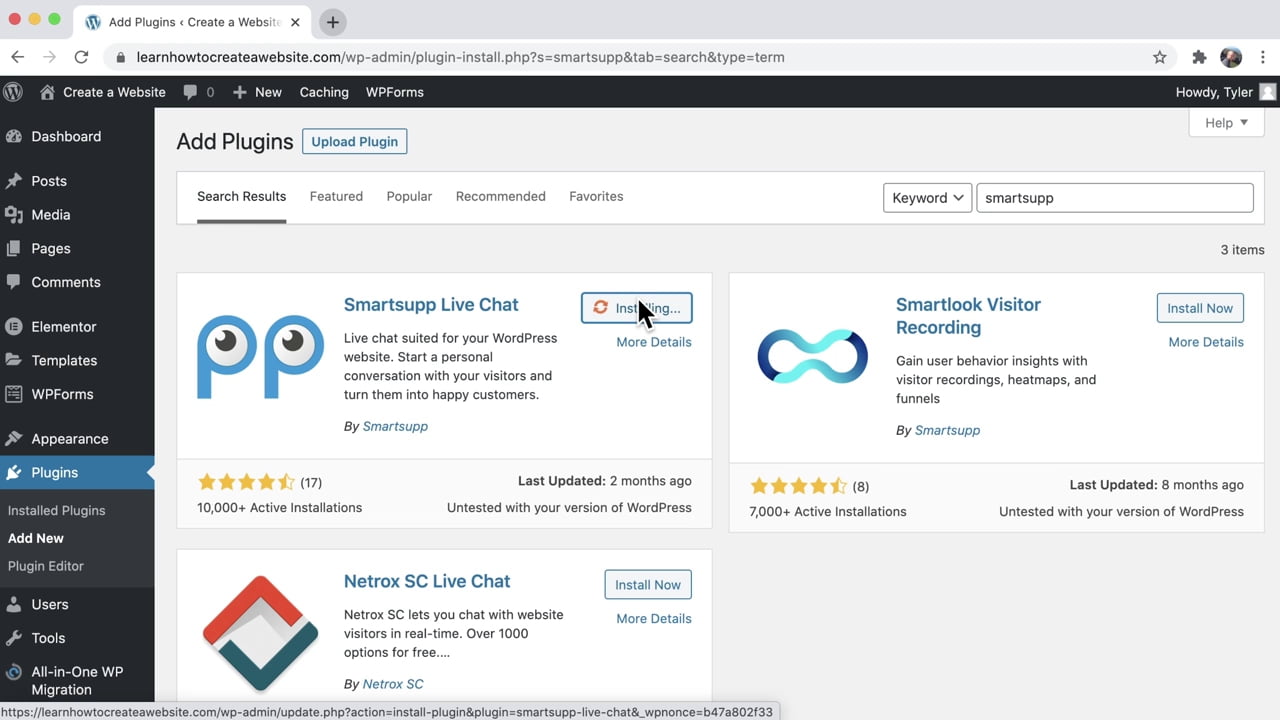
This plugin makes it easy for a web visitor and a website owner to communicate with each other pertaining to a specific topic. This can drastically increase the quantity of sales in a given period of time.
To install and activate this plugin in your site » follow the same process we've been using so far.
Another recommended plugin a new site should go after is the plugin called the Site kit by Google
iv. Site kit by Google
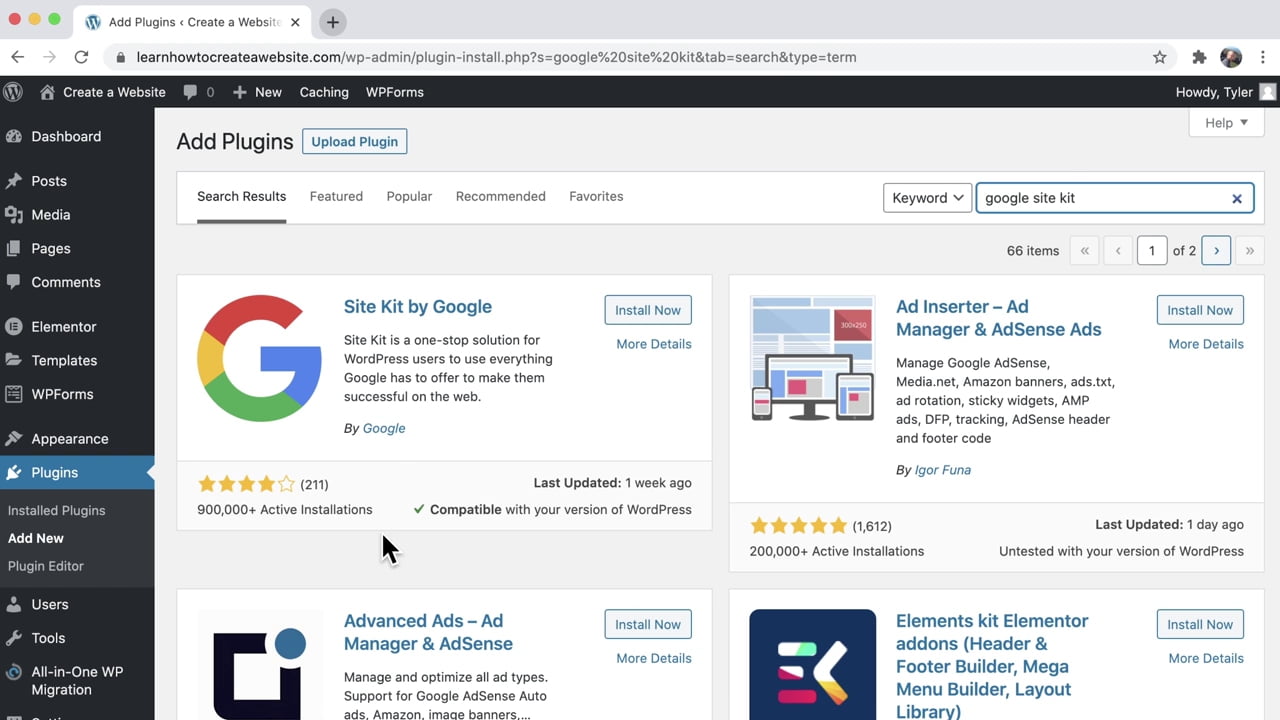
The Google site kit plugin are aggregates of 4 components consisting of
- Search console that allows Google to easily index a site, pages or content. It's also used to fix content issues which can be detrimental to SEO.
- AdSense which allows content creators to make money off their blog or website.
- Analytics which provides a detailed metrics of an overall performance of a site.
- Page speed insights which showcases a Page's speed (this is a ranking factor by Google). Specifically, the faster a page loads, the more their chances of ranking.
You can follow the onscreen instructions to install, activate and use the plugin.
3. Add contents, menus and pages
Before dashing over to site design – it's recommended that you've at least one content in your site. Create at least one blog post so that you'll see the Page post appearance.
There are probably 4 different most used pages such as the
- Homepage
- Blog page
- About page and the
- Contact page
Officially, this pages comes with every WordPress themes. In a rare situation in which the installed theme don't have all the aforementioned pages. Here's a guide to add one.
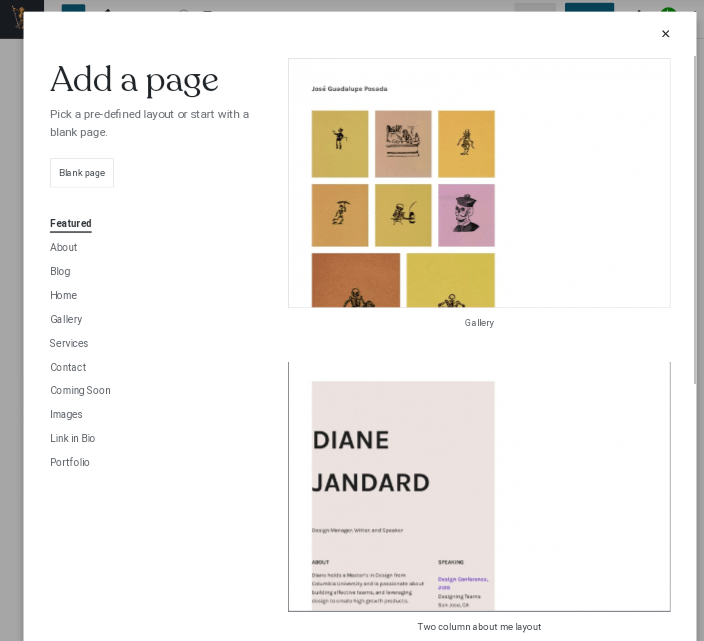
To add a page in WordPress – click on pages > and then add new.
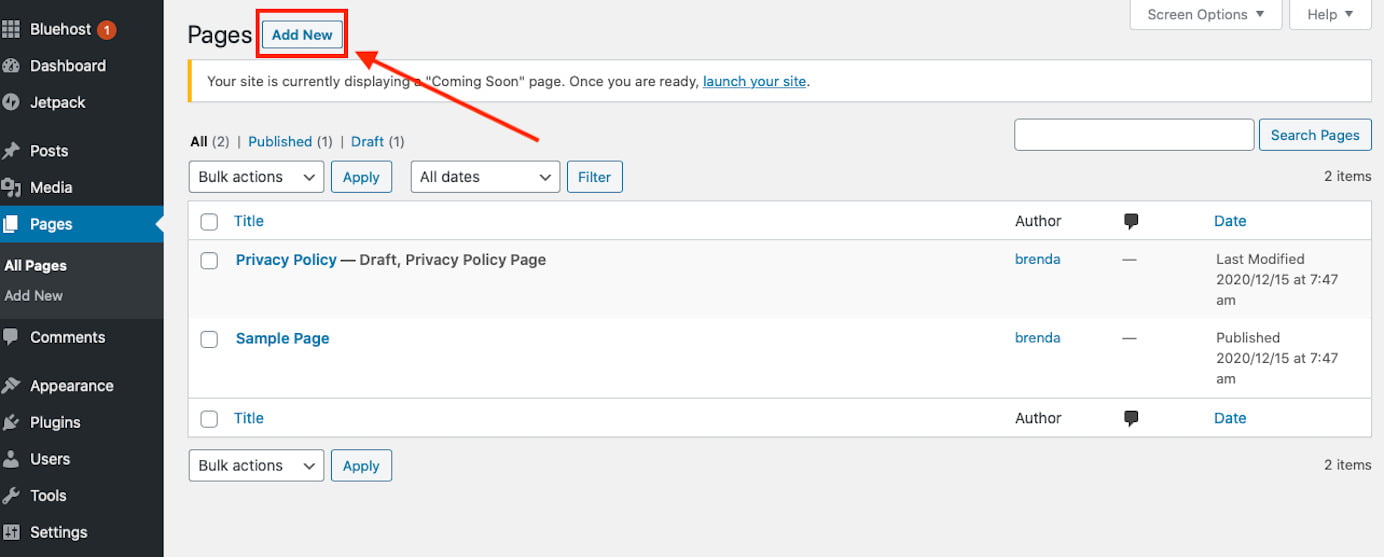
You can choose an already made theme template or you can select the blank button to start a new one.
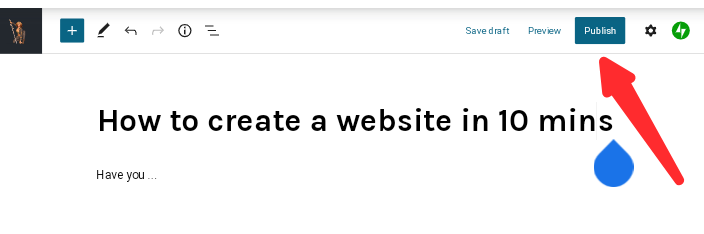
Then, begin typing in the Page's title followed by its body or content.
After finalizing the page – you can click the preview button to take a sneak peek of the page before setting it to life. If you've done with proofreading » click the publish button to set it to life.
After this processes, you can observe that the new page is invisible in your site. To rectify this – follow this guidelines
Go to Appearance > menus > check the box at the desired page > and then, click Add to menu
To write a new blog post > head over to post > and then Add new.
Repeat this process to add more contents in your site.
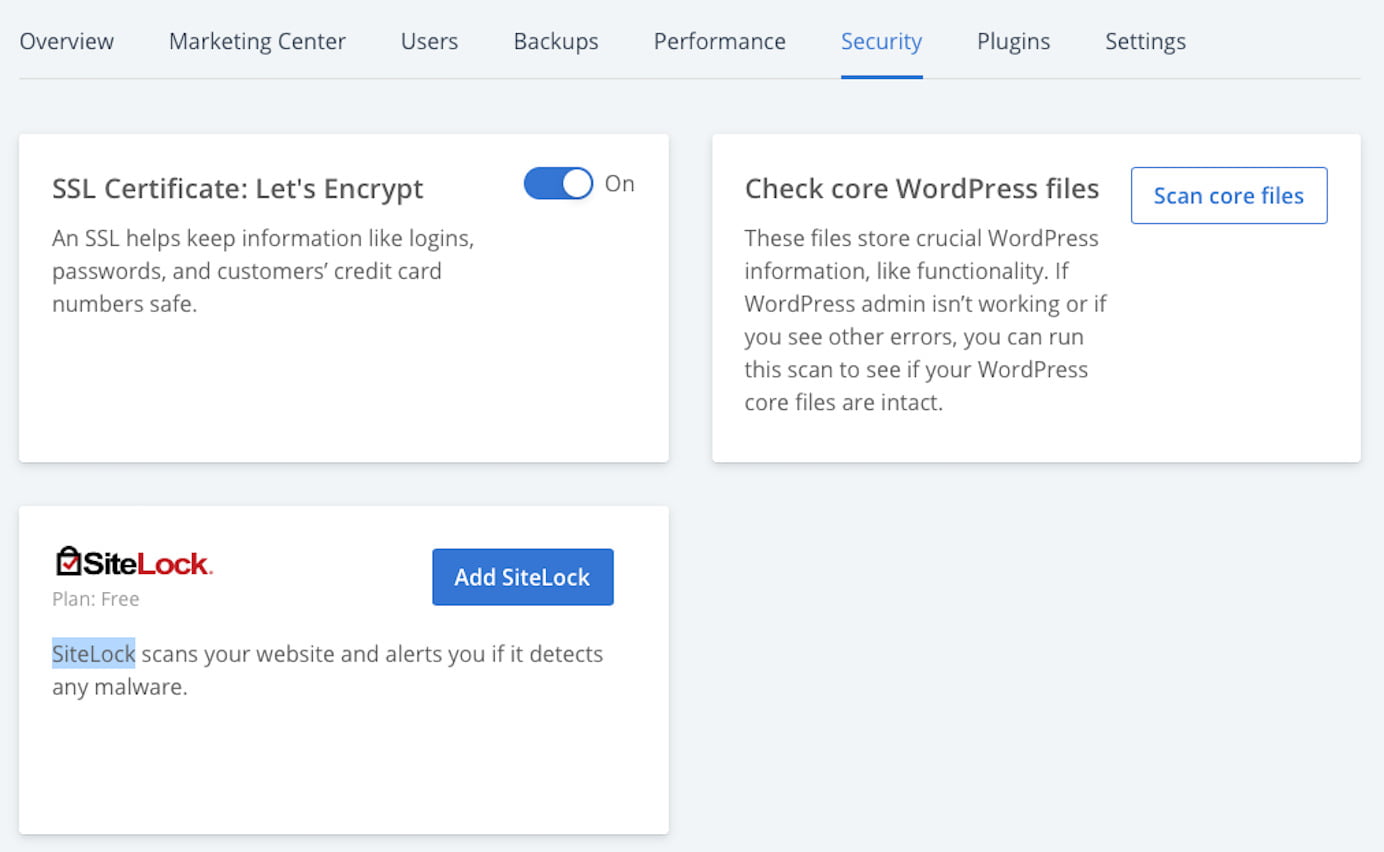
4. Configure SSL
SSL is an initialism of “secure sockets layer”
This protects the data-flow between a content creator and their respective visitors. It secures visitor's data from third party companies that may be so jeopardizing like hacking users, getting there private contents, e.t.c. This can guarantee web visitors to be browsing through your contents risk-free. To configure this security tool or to check if it's active on your new website with bluehost – do the following:
- Go to bluehost.com and login
- Go to my sites
- Click manage site
- Then, find the security tab on the next screen
- Under the section that says Security certificate, verify your free SSL certificate: Let's Encrypt status. The toggle should be activated
- Verify SSL is set up by visiting your site again. A lock icon should appear next to the domain name in your web browser's address bar.
Site design
Site design is a sub-step in this tutorial. You can design your website by yourself but this can take time. You can also hire a web developer to design your site in any way you preferred here. Fortunately, we saved you that coins. Watch this Cool video afore-showcased before ↓
Launch your site to life
After setting up and designing a website » the next thing that follows is to make it visible all over the internet.
Before launching a new site, one should proofread his/her work thoroughly before going to life. You can check that the blog post, the site's design and other factors are perfectly setted-up.
Then, after a rigorous investigation and correction for errors – the time has come to bring the super site to the internet.
To launch your new WordPress site – stick to the processes that follows
- Login into your WordPress account
- Click the big yellow link at the main menu that says coming soon active
- Then, scroll down and hits the button that says launch site
- Then, your site will be life in 24hrs
That wraps it up for “How to create a website in 10 minutes step-by-step”
Congratulations! You're now the proud owner of a new website
Now, you don't need to stop here. Try to Add new contents, tweak with your site design (make sure you've a backup) and try new things.
In no time – You'll not only know about creating a website but you can have all the wits to design a site at a preferred look. And thanks again for taking time to read this post.


This guy don’t know what he literally offer to people free of cost. Many of which would ask you for money, but this guy is on a free drill. Thanks very much for helping me
What an intriguing post. Keep it up. Please can you help me with a cheap hosting provider to start up as a beginner
This post is substantial and concise than other guides on another websites. I like it very much
This is an intriguing post keep it up!