Best Schema Markup Tools for WordPress
Schema markup is a code added to websites that helps search engines understand and display the content in a richer way. It’s a form of structured data that enhances the appearance of search results, enabling features like rich snippets, which can improve a site’s visibility and click-through rates.
What is a Schema Markup Tool?
A schema markup tool is a software or online service that helps website owners generate and implement structured data (schema) on their site without having to code it manually. These tools guide users in creating the right markup for their content, ensuring it complies with Schema.org standards for search engines.
How to Generate Schema Markup
Generating schema markup typically involves:
- Identifying the Content Type: Determine the type of schema markup needed, such as articles, products, recipes, or events.
- Using Schema Generators: Tools like Google’s Markup Helper or other schema tools can help create structured data. You input details about your content, and the tool generates the corresponding markup.
- Embedding the Markup: Once generated, you embed the schema markup into your website’s HTML, or use a plugin to manage it.
WordPress Plugins for Website Schema
Several WordPress plugins help implement schema markup without the need for coding. Below are two top schema plugins:
1. Rank Math
Rank Math is a popular WordPress SEO plugin that offers built-in schema markup functionality. It allows users to create and manage different types of schema for their pages and posts.
How to Implement Schema Markup Using Rank Math
To implement Schema markup using Rank Math SEO, first make sure that the Plugin is installed and activated on your site. You can follow the usual way of activating a WordPress Plugin.
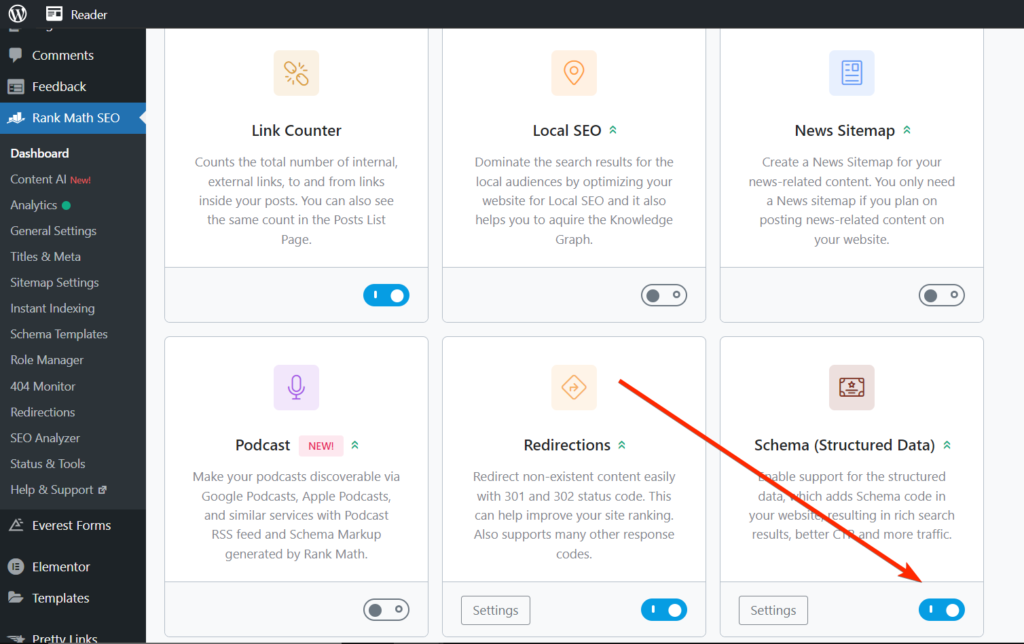
Let’s assume the Plugin is now active on your site, the next thing is to head over to Dashboard > Modules, scroll down, and turn on the schema (structured Data).
Once the functionality is enabled, a new section called Schema Templates will be added to the navigation.
You can set up schema automation for certain types of pages and also can add additional schema as you work on your page, but we’re coming to that.
Let’s look at schema markup automation first.
Setting up Schema Automation with Rank Math
To bypass the stress involved in implementing schema markup for each of your Pages, you can decide to employ schema automation.
Using it, schemas are injected into pages of the same type and you no longer need to repeat them from page to page.
To automate schema markup with Rank Math SEO, follow these steps.
Go to the Rank Math SEO section on WordPress, then “Schema Templates”, and then “Add New Schema”.
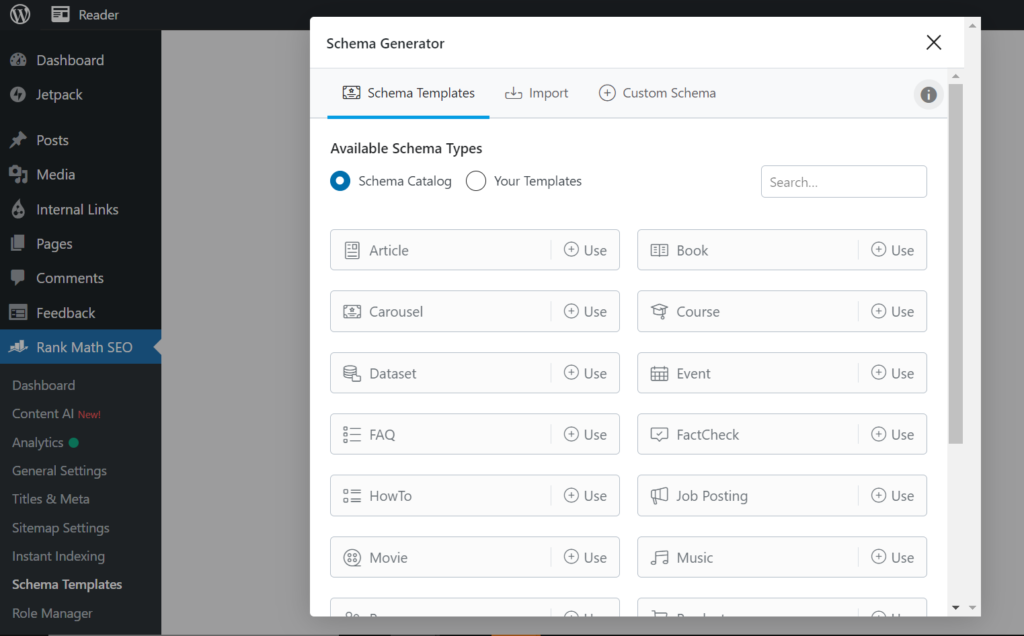
You’ll be brought to a page where you can see all the available schema types offered by the plugin.
The available Rank Math schema markup types are below for reference.
- Article
- Carousel
- Dataset
- FAQ
- HowTo
- Movie
- Person
- Recipe
- Service
- Video
- Book
- Course
- Event
- FactCheck
- Job Posting
- Music
- Product
- Restaurant
- Software
From the available schema types, choose the one you want to automate for a specific category of your pages.
We’ll be going with the article schema which is mostly used.
Here’s a configuration for the Article Schema type.
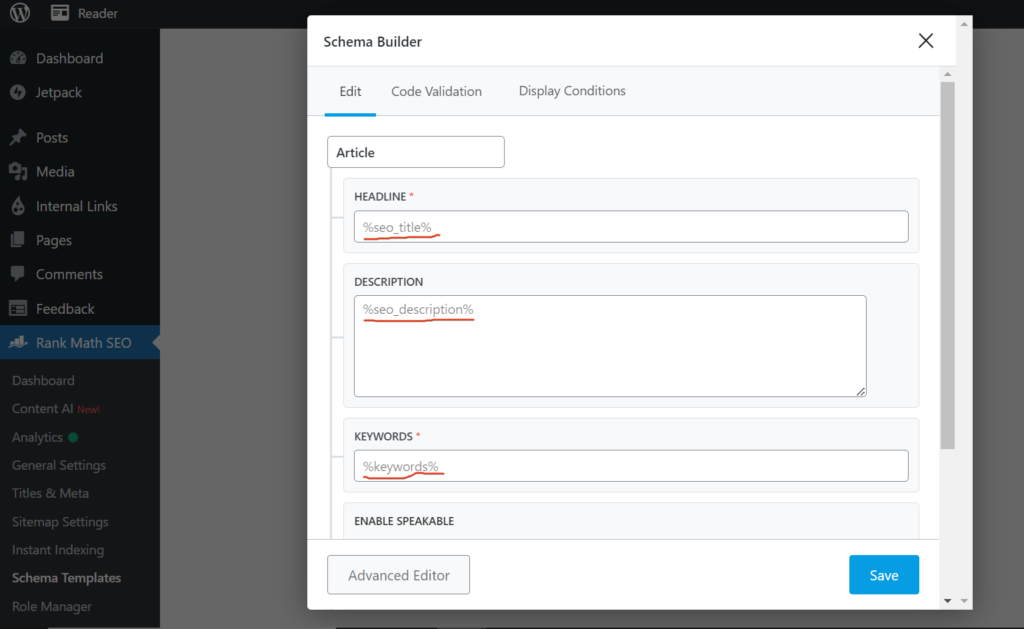
By default, the details are filled with placeholders which means your page’s unique headline, description, and SEO keywords will be used.
You also have an additional ability to enable speakable which works pretty well for voice searches.
There are three Article types to choose from. You should select the right one depending on your niche or configuration.
If you’re familiar with coding (bear in mind that you don’t have to) and prefer to see the code, you can use the Advanced Editor.
Refer to the “Display Conditions section” to specify the conditions that should be involved before your automated schema gets applied to a page.
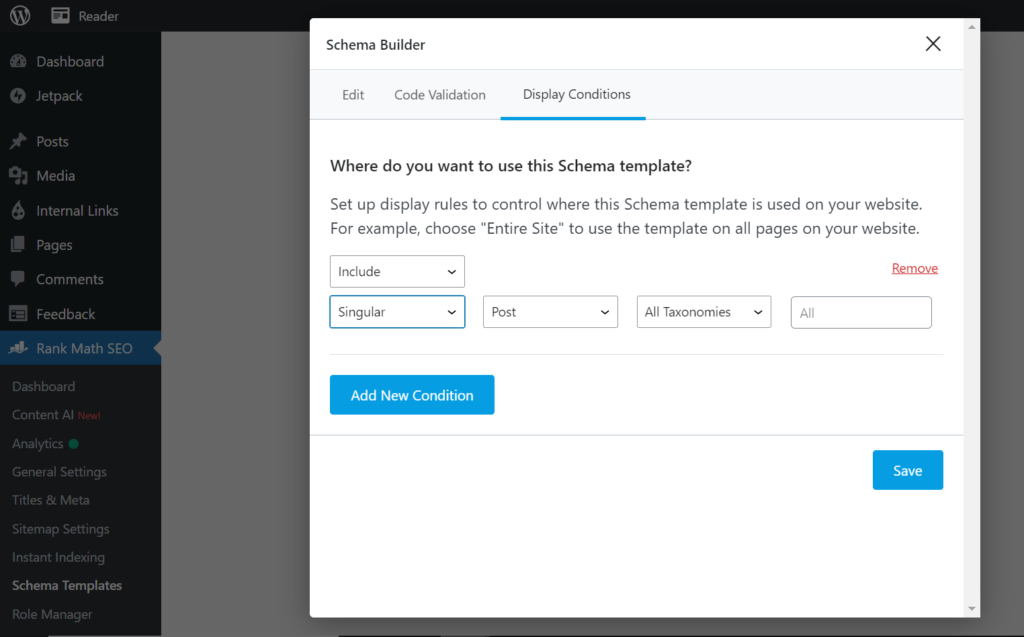
We recommend adding as many conditions that matter to enable you to come to a state where the schema is only applied to the right pages.
Use the Include option to add items where the schema should be applied. Use the Exclude option to instruct Rank Math to remove items from the bounds of the schema markup.
Coming to the next option are the ‘”Singular” for individual posts, pages, or custom post types (like articles), “Archives” for archive pages (e.g., category archives, tag archives, or date-based archives), and Entire Site.
Since we only want the Article Schema to get applied on blog pages only, we’ll choose “Singular”, then Post as “Type”.
If you don’t want the schema to get applied on all Posts, you can further use the configuration to select which Category, or Tag or Format you want.
When everything is in place, use the SAVE button to apply it to your site.
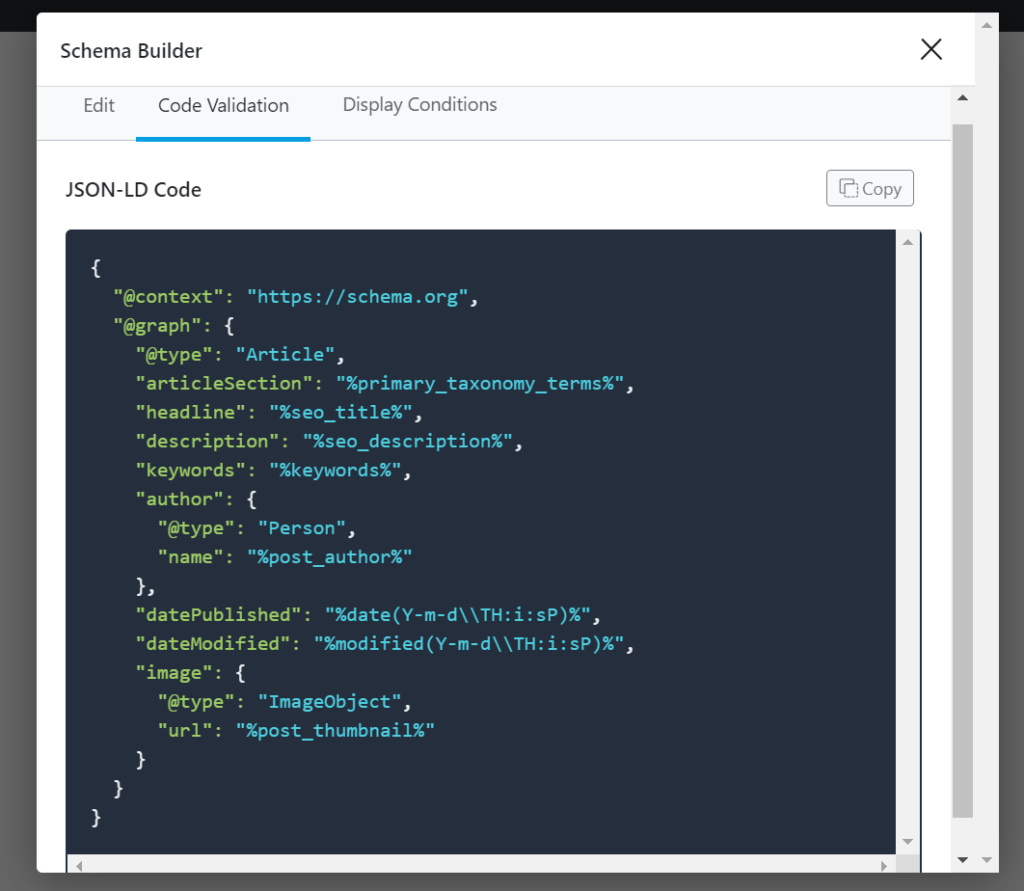
You can verify the correctness of the code by going to the section “Code Validation” located just at the right. Simply copy the code and then open the Google Rich results tool to scrutinize it for errors.
Adding schema markup from the post-edit screen
Schema Automation will not do the entire work for you. Because pages are different and contain diverse content, schema automation can only do let’s say 10% of the work (and that’s merely placing structured data on pages that belong to the same family), then the rest of the work is done by placing additional schema depending on the elements of a page.
From the Edit environment on WordPress, refer to Rank Math’s box located on the right side above the page, then go to the schema section.
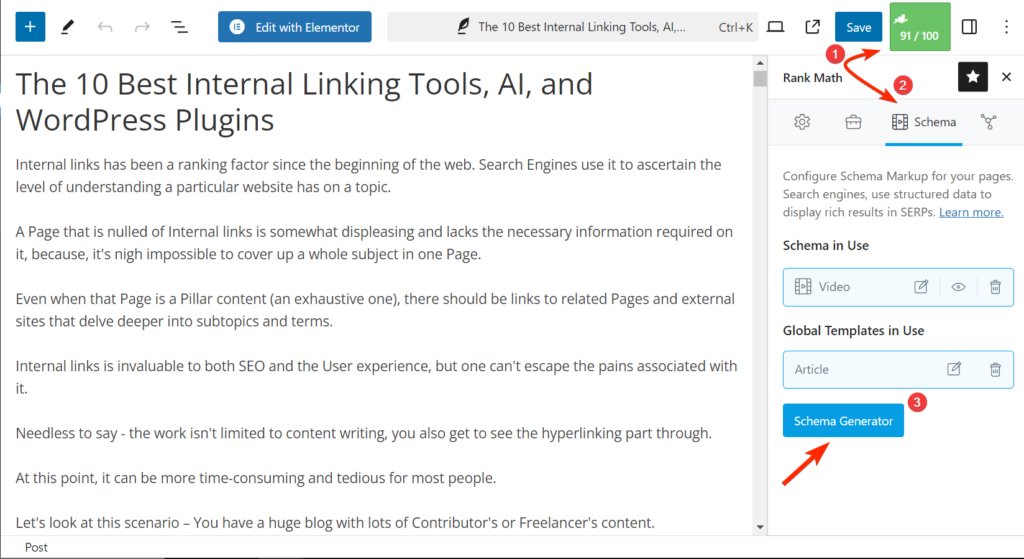
From there you can see the structured data you have implemented for that page including automated ones.
To add a new schema, click the schema generator button.
You’ll be brought to a screen that shows all the available schemas that can be applied. Choose the one you want by using the “Use” button next to them.
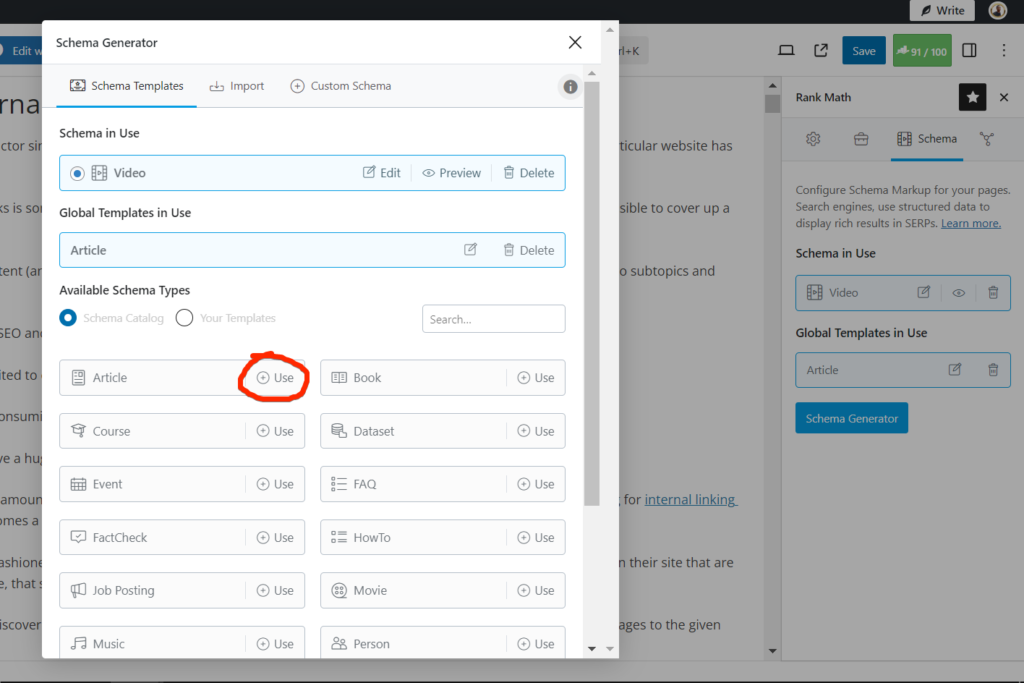
For this post, we’ll be using the FAQ schema which is widely used.
After opening the FAQ schema, we can begin filling in Questions and Answers for Rich results.
But that’s not the best place to add the FAQ schema to our content says Rank Math.
Note: Rank Math prefers adding the FAQ schema and the How-to schema using its block element. When you add it this way, then you will have it as text in your content.
So let’s go back and use the FAQ schema instead.
On the Edit screen, start typing “/faq” in the preferred place usually at the end of your post content. Alternatively, you can look up for the FAQ schema on the Block store.
Here’s the FAQ schema by Rank Math.
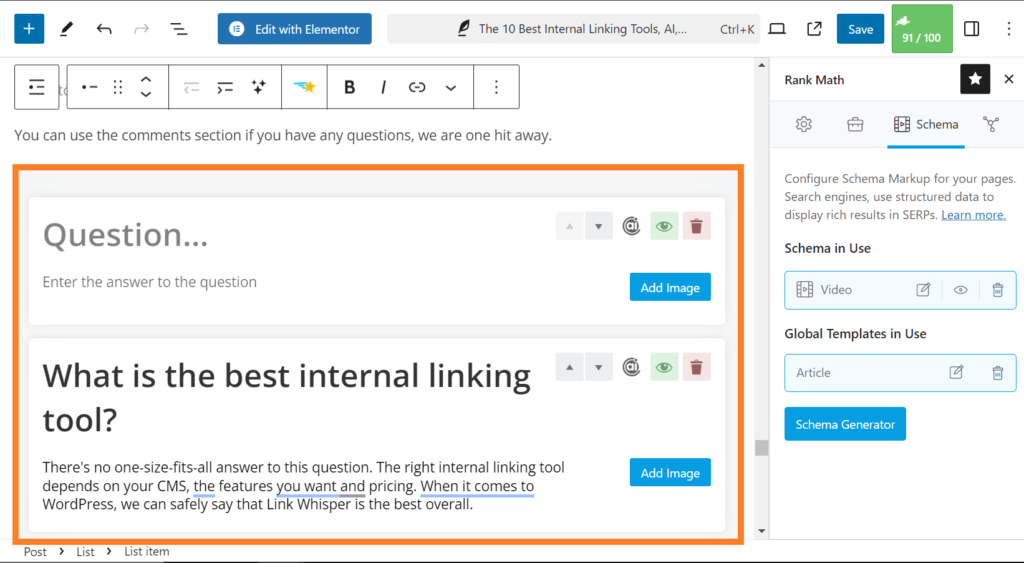
To fill it, simply keep adding Questions with their respective answers. When you’re done, publish the changes. The added content will look like normal text from the public view.
Now you can add FAQs to your content while also optimizing them for Rich results.
To add other schemas, repeat the same steps. Go to the green SEO Ratings button, then slide to the Schema tab. Click “Schema Generator” to come to the place where you can add structured data.
Select the desired schema and input the required fields, then save it.
There’s sth I want to show you.
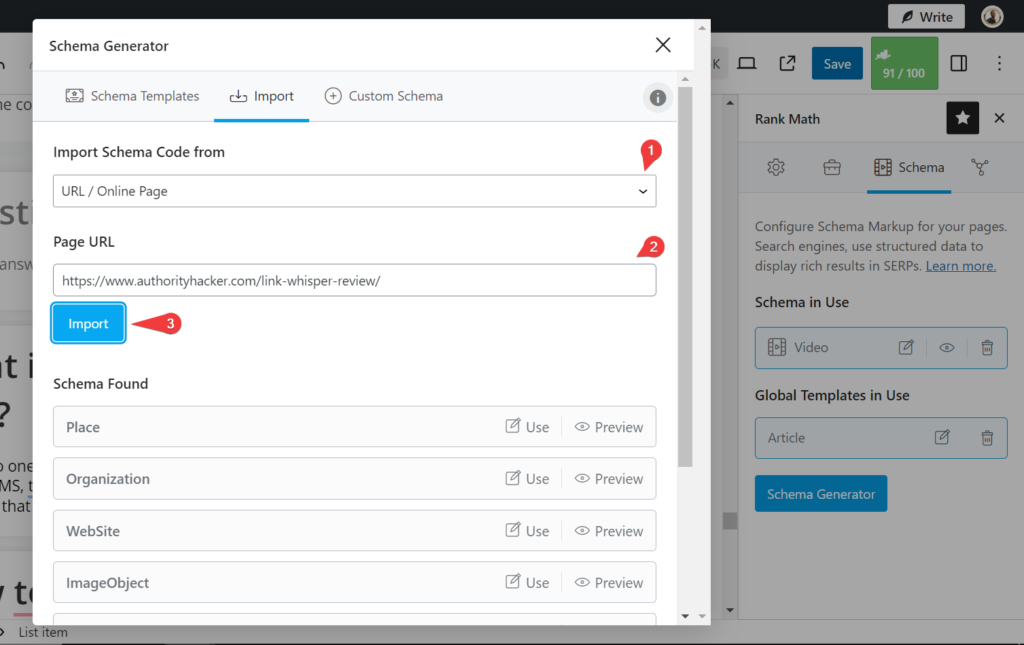
There are two other separate tabs on the screen. One is the “Import” which allows you to replicate a desired schema from another website.
The other is the Custom Schema tab, this is where you can add custom data as its name suggests.
Rank Math as an SEO Plugin has managed to include everything related to search optimization. Of which Schema (structured data) is one of them.
2. Schema Pro
Schema Pro is another excellent WordPress plugin that simplifies the process of adding structured data to your site. It automates schema implementation across your entire site.
How to Implement Schema Markup Using Schema Pro
Install and activate the Plugin.
Find the Plugin offerings under Settings.
You can implement schema automation site-wide plus add additional ones as you do your stuff on the edit environment.
Setting up Schema Automation with Schema Pro
To set up an automated schema or schema template that will be running on autopilot for a selected number of Pages, refer to the Schema Pro section from the WordPress admin area.
You can find it under the “Settings tab”.
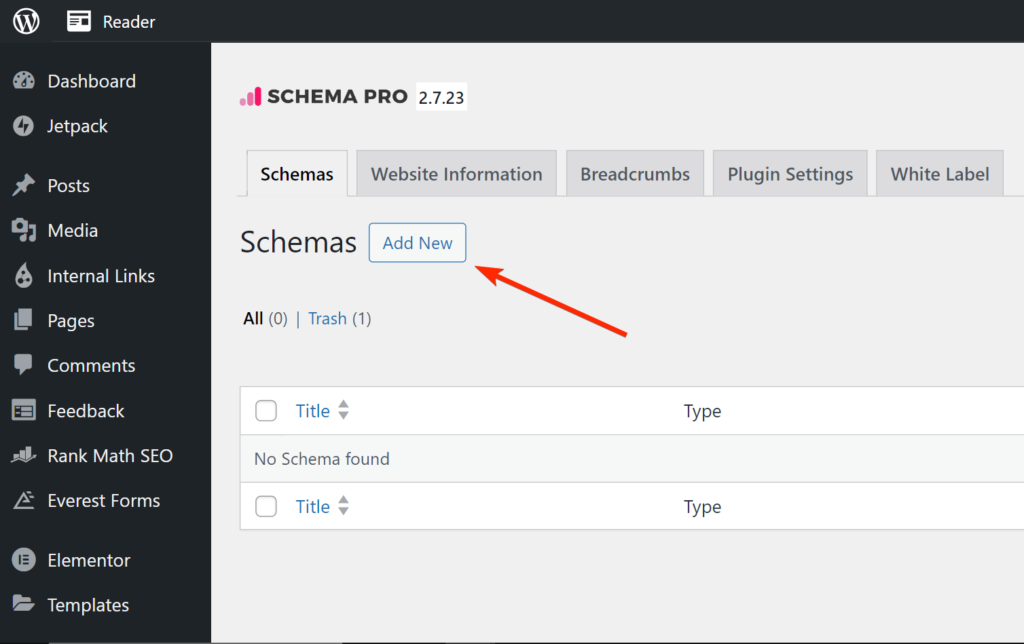
Once on the screen, click on “Add New”. You’ll be brought to a screen where you can choose the markup you need.
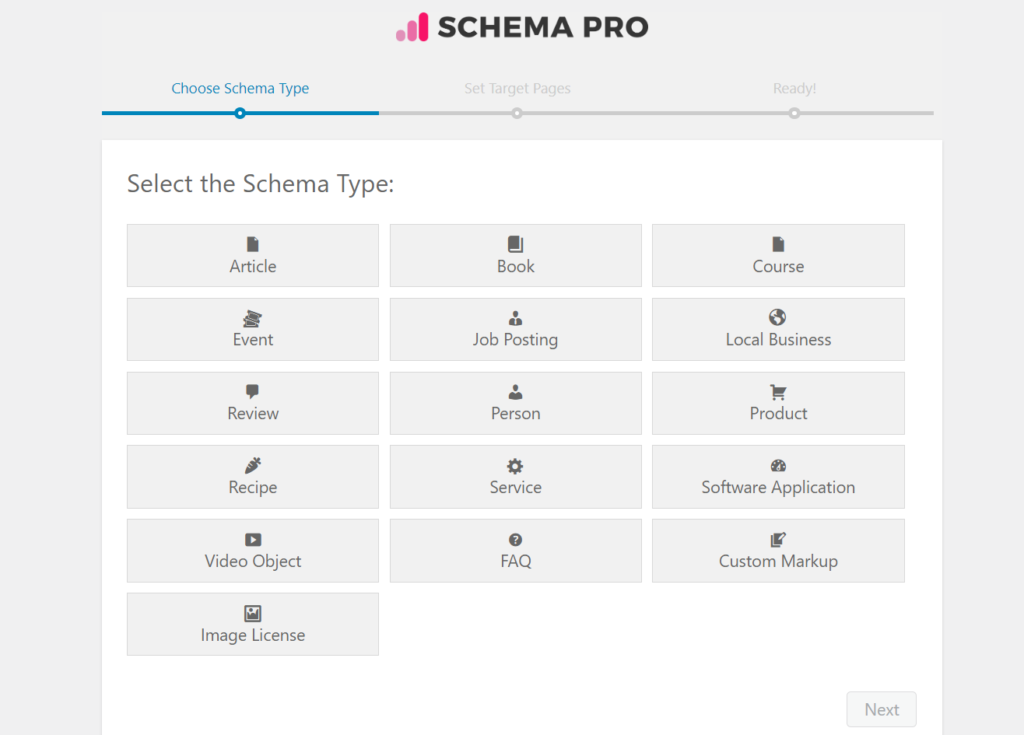
For the purpose of our topic (i.e., automation), we’ll be going with the article schema type.
That’s a kind of structured data that works for automation.
So having selected the article schema. The next thing is to specify the places where this structured data can be applied on. The “Enable On” and “Exclude From” act as filters that whitelist and blacklist certain types of pages from the schema automation.
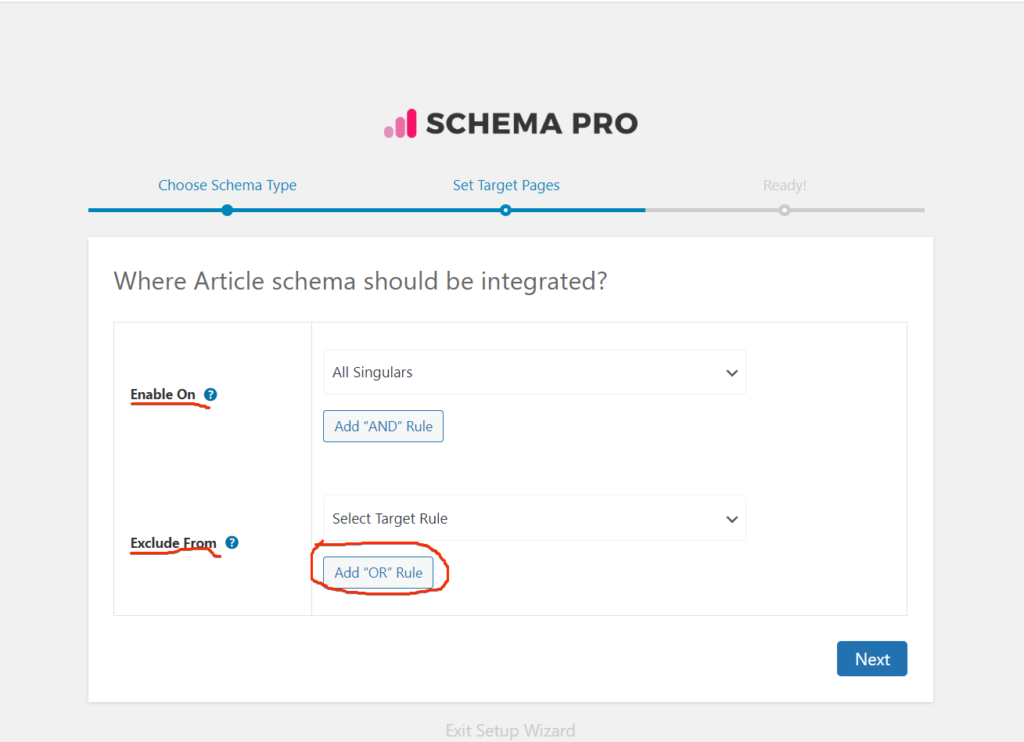
Do your work accordingly here and proceed to the next page.
Because we’re building an article schema for our blog pages, we’ll choose “Singular” from “Enable On”. Then we’ll use the button “Add AND Rule” to specifically target our pages that are blog pages.
After adding a rule with the “Add AND Rule”, we’ll look up for “All Posts” as a target and we’ll select it.
We’re now all set!
There’s also an “Exclude From” rule lying below the screen. In case you want to add pages that should be blacklisted, you should add them here.
Once done, click “Next”
The page now tells us that our schema is ready. Just hit “Complete” to publish it live.
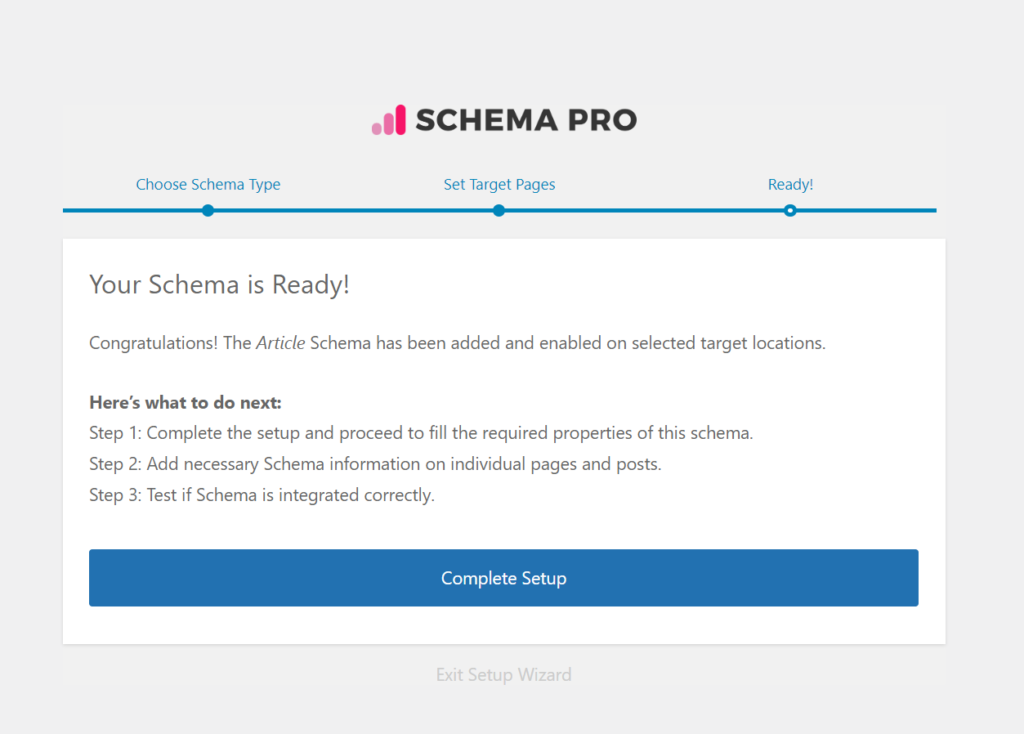
You can test your schema on Google’s Rich Result to ensure that it is implemented correctly.
Before you go, Schema Pro brings us to a screen where we can do more customization to the article schema. Just after we hit the big complete button, it directed us here.
Here are the things that you can specify from the screen
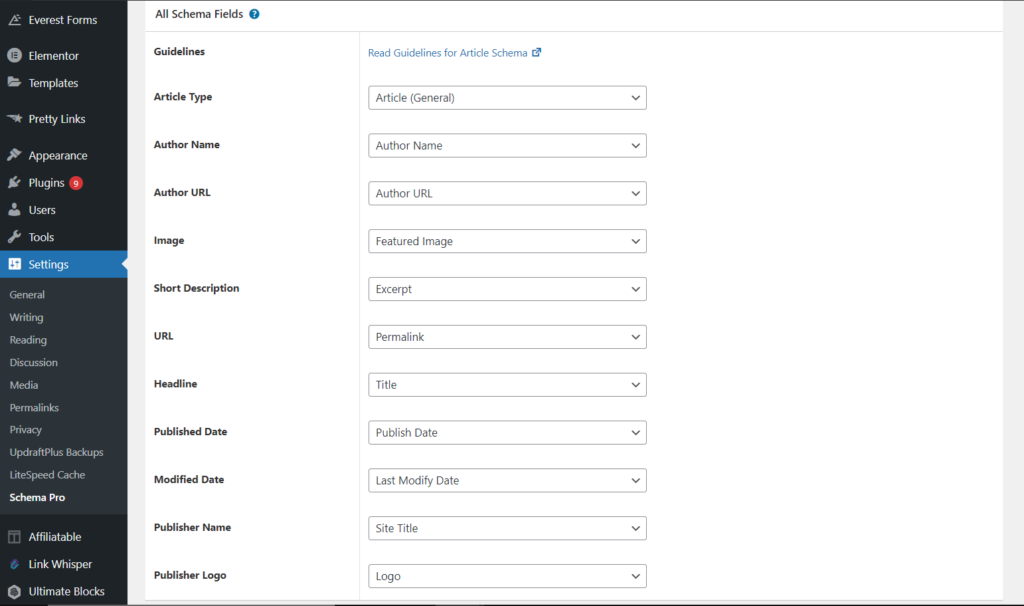
- Article Type
- Author Name
- Author URL
- Image
- Short Description
- URL
- Headline
- Published Date
- Modified Date
- Publisher Name
- Publisher Logo
The “Article Type” contains different kinds including Blog Posting, News Article, Tech Article and Scholarly Article. Just make sure that you’re selecting the right one for your page.
Adding schema markup from the post-edit screen
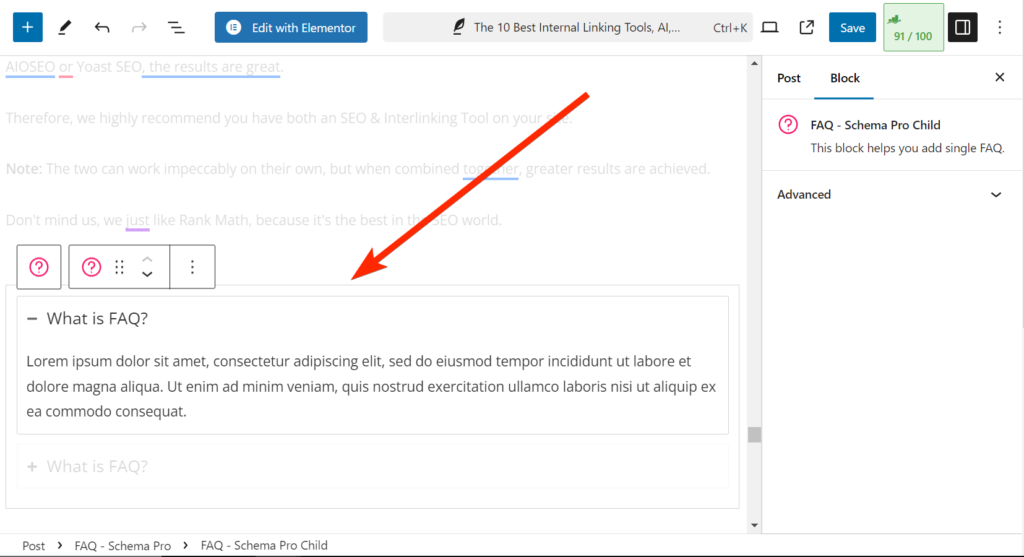
You can add some schema types such as How-to and FAQ from the post-edit screen.
To reach them as you do your stuff on WordPress, just browse the Blocks library. Alternatively, you can locate them with the shortcut “/schema/”.
Google Tools for Schema Markup Generation and Testing
We have been talking about WordPress Plugins, let’s come to Google Tools for Schema Markup.
Google offers several tools to help website owners create, test, and validate schema markup.
1. Markup Helper
Google’s Structured Data Markup Helper assists in generating schema code. You select the content type, highlight relevant sections, and the tool creates the markup for you.
Here’s how it works.
Go to Structured Data Markup Helper, and select a data type like Articles, or Events, or Movies, etc.
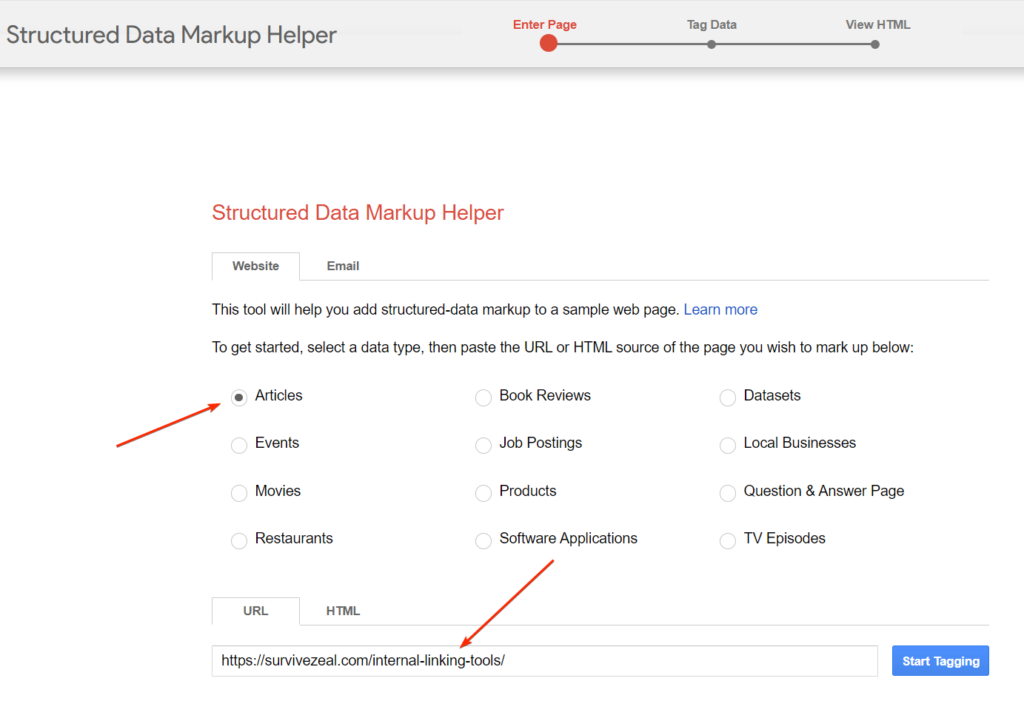
Paste the URL of the post you’re trying to implement schema on. Or alternatively, enter the HTML of the page.
Click “Start Tagging”.
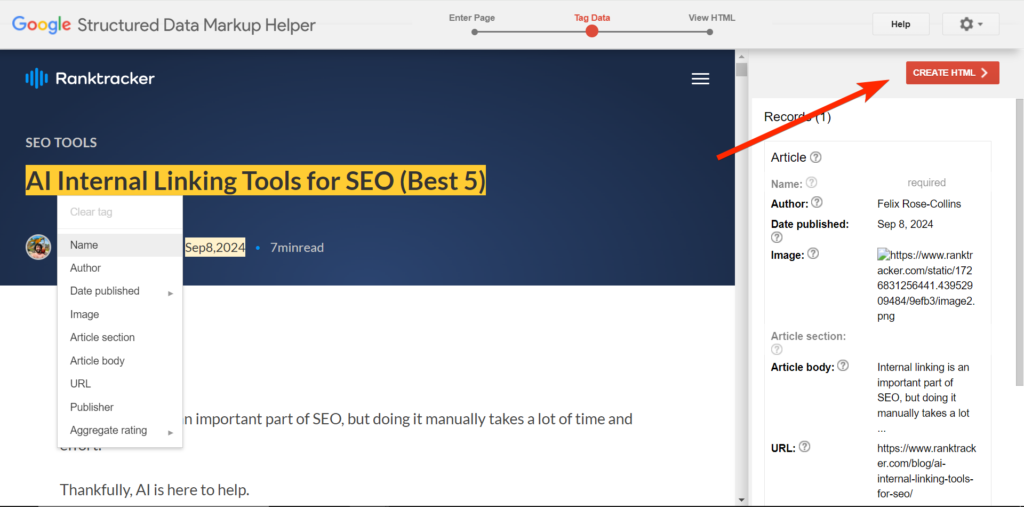
Highlight parts of your page from the left and select the right markup for it. Once a markup is selected, it will appear on the right-hand side.
When you’re done filling in the missing details as shown on the right, then click “Create HTML”.
The tool will automatically generate a JSON-LD code for you. Add the script to the head section of your HTML.
You can learn how to use the tool in detail.
2. Rich Results Test
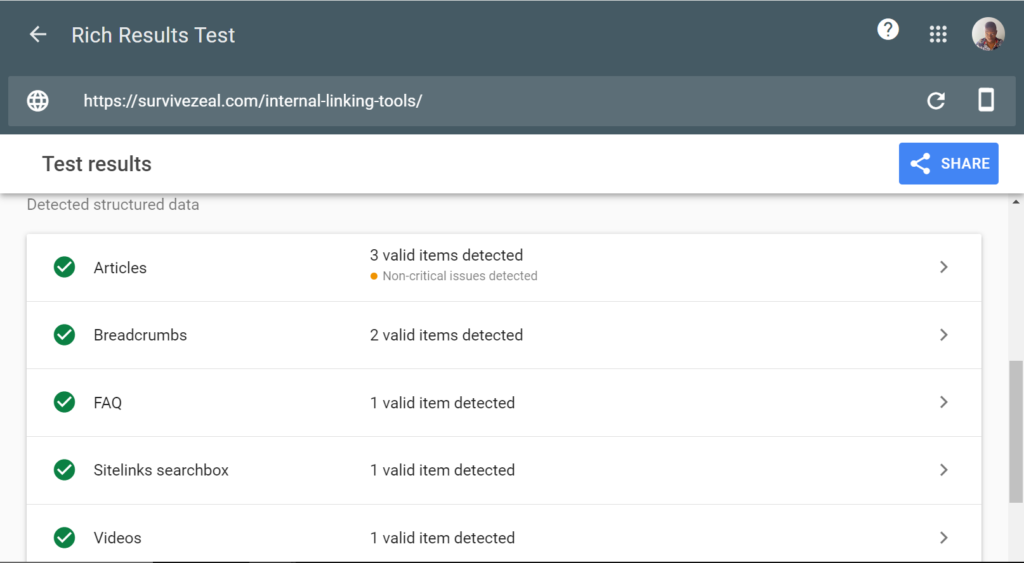
This tool helps determine if your page is eligible for rich results in Google search. Simply input your URL or code, and the tool will analyze the structured data.
The Rich results test should be employed before publishing structured data to live.
After you have marked up your pages for Rich results using Rank Math or any other tool, the Rich Results tool serves as a resource to test the validity of your code, ensuring it appears as a rich result on SERPs.
3. Schema Markup Validator
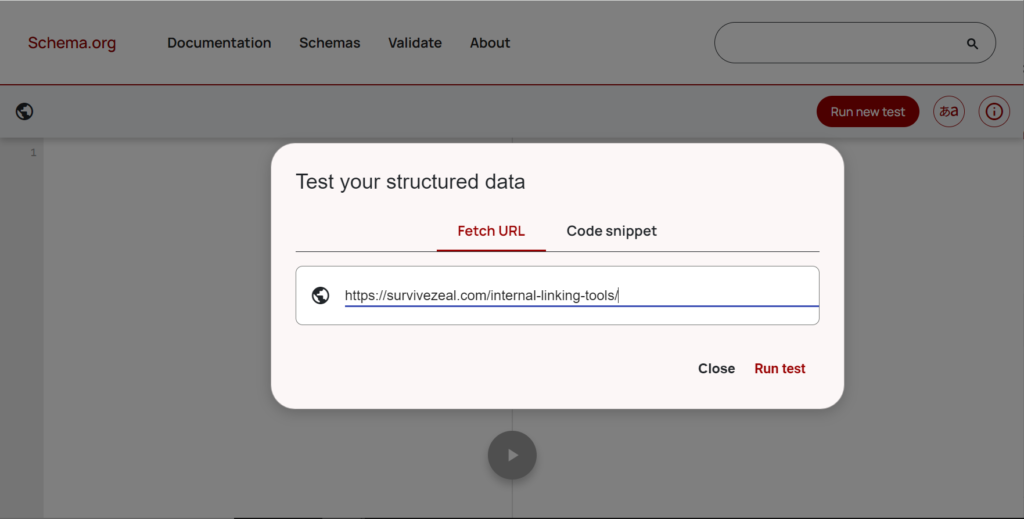
Similar to the Rich Result Test, the Schema Markup Validator lets you check if you have nested and structured your markup following schema.org guidelines.
It’s different from the Rich Result Test tool because it focuses specifically on the syntax and structure of your schema markup, regardless of whether it qualifies for rich results on Google.
The Rich Result tool rates your work against eligibility for search appearance while the Markup Validator rates it against validity with Schema guidelines.
Both tools are a great resource for testing structured data.
Conclusion
To sum it up, picking the right schema markup tools for your WordPress site can make a big difference in your SEO game and get you noticed more in search results.
Rank Math, for instance, shines with its smooth schema integration, especially if you’re already using the plugin. It’s a solid pick for enhancing your structured data without adding any extra costs. On the other hand, Schema Pro exist as plugin that is fully concentrated on structured data.
Now, let’s talk about using Google’s tools like the Rich Results Test, Markup Helper, and Structured Data Validator. These are your go-to for checking that your schema is set up correctly and doing what it’s supposed to. They help you spot and fix any issues, making sure your site shows up just the way you want it to. By usiing these tools, you can fine-tune your website’s schema setup and boost engagement, driving better results in search engines.


